

Photo by Rudolf Kirchner on Pexels.com
By now you should have a rough cut of your interview, which is approximately the desired length of your final mix. In this installment we’re going to get into some more tools of Audacity which will allow you to refine your work further. (For the previous installments begin here and then follow the links at the end of each installment.)
In the top menu, you’ll see a menu item, Effects. If you click on it you’ll get a long list of choices:
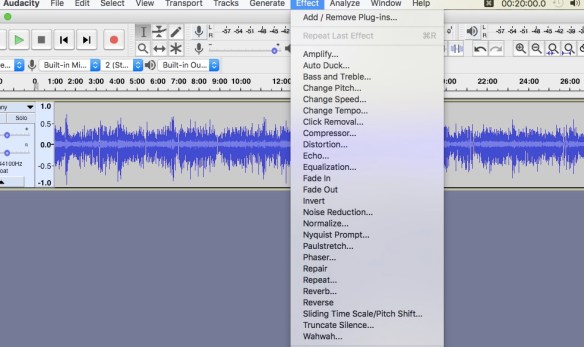
There is so much that can be done with Audacity, but the truth is, to produce interviews and spoken word broadcasts, you will only need to use a few of the pictured effects. Of course, afterwards you can play around with all kinds of special effects such as Echo, Reverb, Wahwah, and so on for fun, but we are just going to concentrate now on the indispensable effects that you would need in normal use: Fade Out, Fade In, Amplify, and Change Tempo.
When you click on most of the effects, there will be some default settings. The defaults generally give a good result, so I don’t recommend messing around with those settings for now. The first ones we will look at are the Fade In and Fade Out effects. Suppose you have clapping or music at the end that you want to fade out; you simply highlight the section on the track from the point where you want the fade to start to the point at the end where you want the sound totally muted. Then simply click on Effect—>Fade Out. You’ll see that you can use the effect over the same area more than once if you like. Likewise, with Fade In: often you want to fade in the music leading into or out of an interview. To do this, simply highlight an area and then click on Effect—>Fade In. Also remember you can always undo an effect with the Edit—>Undo menu item.
Next, let’s look at Amplify. An uneven sound level is a very common problem, and if the volume in general is too high or too low throughout the audio track, or variable throughout the track, we will deal with that later with an effect called Compressor. The Amplify effect, however, is most useful really for small areas where you need to bump up or tone down the volume. Perhaps someone turned away from a mic for a moment, or there was a loud unwanted background noise.
If you click on Effect—>Amplify, you’ll see that there’s a little box that says Allow Clipping. You want to make sure that that box is not checked.

Clipping means that the volume has reached such a high level that the sound is going to become distorted. Most of us have experienced that distortion when, for example, we turn up the sound to maximum on inexpensive speakers. So we want to be careful when working with sound that we keep the volume within certain limits, so that the vocal frequencies are not clipped. There are two main ways that clipping can be introduced into a mix: 1) either during recording, the source is too close to the mic and the recording volume is set too high (in which case most recorders will flash a red warning signal) or 2) using the Amplify effect in editing the volume is too high and so clipping occurs. By leaving the Allow clipping box unchecked, Audacity will prevent you from bumping up the volume too high.
How do you know if you’re clipping? Go to View—>Show clipping(on/off). Make sure there’s a check mark next to it. If not, click on it.

If the recording or the editing has introduced clipping, you will see it represented by red lines in the waveform:

While a little bit of clipping is not a disaster, in general, you certainly want to avoid adding more. We will learn how to handle extensive clipping in the next installment, but for now, we don’t want to add any more of it through injudicious use of Amplify.
Amplify, interestingly enough, not only is handy for bumping up the sound, but also for making the volume softer when it needs to be. Your main control, after you highlight the area you wish to change, will be the slider you see when you click on Effect—>Amplify. Moving the slider to the left will decrease the volume (shown as a negative number of decibels); moving it to the right will increase the volume (a positive number of decibels). The general rough rule of thumb is that every + or – 6dBs doubles (or halves) the perceived volume (it depends upon many factors including the frequency of the sound and human psychology.)
The final effect we’ll discuss is a very useful one named Change Tempo. If you look at the first picture above, you’ll notice two other similar sounding effects, Change Pitch and Change Speed. But those are not going to be of much use to us. Change Tempo does something very interesting. Within limits, it changes the duration of a selection without changing the pitch. If you think about it, normally if you speed up a recording it also starts making the voices sound like chipmunks. But the Change Tempo effect shortens duration without affecting the pitch of the voices. It does so by cleverly shortening the spaces between words. Practically what that means is that if you are fighting to cut the last few seconds from a track in order to get within your time constraints, you can do so using this effect.
Now, to be sure, you cannot shrink the time of your track by very much before it becomes noticeable; I find, however, that you can submit a 2-3% tempo change cleanly without any apparent difference in sound quality—and the elimination of those few seconds (say, about twenty seconds for a fifteen minute piece) may be just what you need to make your time limit.
So there you have the most effective effects you can apply to your track. Next time we’ll talk about adding more than one track so that you can have overlapping music, and we’ll also talk about how to prepare your final mix for export. See you next time.
The next installment is here: https://jackshalom.net/2018/11/09/radio-interview-production-workshop-12-laying-down-the-tracks/

Thanks for the info Jack.
I must admitt, however:
the past three ‘Workshops’
have made me REALLY aprreciate
the knowledge of a,……Sound Technician(!).
WoW!,….what goes into the cutting, splicing,
…listening,
……re-listening(!).
,….maybe I’ll make movies. 🙃
Oh, don’t let this intimidate you, Dennis. It reads much more complicated than it is. (It’s like trying to describe a simple card magic sleight like the Glide—if you were here sitting next to me, I could show you in person easily). Do it, play around with it, discover. I don’t claim at all that this is the only way or even the correct way to approach things–it’s more just my sharing my journey with you. When I get to the end of this series in an installment or two, I’ll finish off with a troubleshooting piece, and then I plan to compile it all into one downloadable free e-book.